目录
Shell基础入门用例 Shell成品脚本(摘抄)
自动间隔截屏保存 把oc渲染序列帧,分到各个文件夹里 ffmpeg把oc渲染序列帧,处理成视频文件
记录一次Magick探索性管线
使用Magick做图片混合的pre-后处理 magick为贴图库建立预览图索引
FFmpeg实战记录
1. Shell基础入门用例
用处:处理G001开头的文件命名错误,转换为G003开头for i in `ls|grep G001`;do mv $i `echo $i |sed 's/G001/G003/g'`;done
渲染序列预处理脚本获取文件夹内第一个文件名:ls -l | grep '^-'|awk -F" " '{print $9}'|grep '[0-9][0-9][0-9][0-9]\.'|head -n 1
获取起始帧编码数:ls -l | grep '^-'|awk -F" " '{print $9}'|grep '[0-9][0-9][0-9][0-9]\.'|head -n 1|awk -F"." '{print $1}'|tail -c 5
数字转换成可表达的sed 's/0000\./%04d\./'
ffmpeg cfhd操作ffmpeg -start_number 0059 -i $encodefile -c:v cfhd -b 200M $targetfile
获取当前文件夹名:basenamepwd|sed 's/\ /_/'
获取当前目录下的文件夹ls -l | grep '/'|awk -F" " '{print $9}'
获取子目录下的第一个文件名:for i in `ls -l | grep '/'|awk -F" " '{print $9}'`;do ls $i -l | grep '^-'|head -n 1|awk -F" " '{print $9}';done
2. Shell成品脚本(摘抄) 2.1 自动间隔截屏保存
该功能已经转用python实现,项目地址
while [ 1 ] ;do mkdir /e/每日截屏/`date +"%m-%d" ` >/dev/null 2>&1;ffmpeg -f gdigrab -i desktop -s 2240x720 /d/每日截屏/`date +"%m-%d" `/screenshot-`date +"%d %T" | sed -e "s/ /-/g; s/:/-/g" `.jpg >/dev/null 2>&1; sleep 10 ;done
图片确实是截了,按照时间截的,不按顺序,串不起来视频。
STEMP=0 for i in `ls -l | grep -v '/' |awk -F" " '{print $9}' `;do echo $i ;mv $i screenshot`printf "%05d" $STEMP `.jpg;let "STEMP += 1" ;done firstfile=`ls -l | grep '^-' |awk -F" " '{print $9}' |grep '[0-9][0-9][0-9][0-9]\.' |head -n 1` index=`echo $firstfile |awk -F"." '{print $1}' |tail -c 5;` encodefile=`echo $firstfile |sed "s/$index \./%04d\./" ` sstemp=`basename $PWD ` targetfile=../`echo $firstfile |head -c -10`_$sstemp '.mov' ffmpeg -start_number $index -i $encodefile -vcodec mpeg4 -b 30M $targetfile -y
然后就可以获得带mpeg4编码的中间件了。
在截图文件夹直接调用这个脚本
for j in `ls -l | grep '/' | grep -v 'done' |awk -F" " '{print $9}' `;do STEMP=0 for i in `ls $j -l | grep -v '/' |awk -F" " '{print $9}' `;do echo $i ;mv $j /$i $j /screenshot`printf "%05d" $STEMP `.jpg;let "STEMP += 1" ;done firstfile=`ls $j -l | grep '^-' |awk -F" " '{print $9}' |grep '[0-9][0-9][0-9][0-9]\.' |head -n 1` index=`echo $j /$firstfile |awk -F"." '{print $1}' |tail -c 5;` encodefile=`echo $j /$firstfile |sed "s/$index \./%04d\./" ` sstemp=`basename $j ` targetfile=./`echo $firstfile |head -c -10`_$sstemp '.mov' ffmpeg -start_number $index -i $encodefile -vcodec mpeg4 -b 30M $targetfile -y mv $j `echo done $j `done
2.2 把oc渲染序列帧,分到各个文件夹里 for i in `ls -l|awk '{ print $9 }' |awk -F_0 '{ print $1 }' `;do mkdir $i 2>&1;done ;for i in `ls |grep / | awk -F/ '{ print $1 }' `;do for j in `ls |grep $i '_0' |grep -v /`;do mv $j ./$i /$j ;done ; done
2.3 ffmpeg把oc渲染序列帧,处理成视频文件 常规文件处理:将当前文件夹内的序列帧处理成视频
firstfile=`ls -l | grep '^-' |awk -F" " '{print $9}' |grep '[0-9][0-9][0-9][0-9]\.' |head -n 1` index=`echo $firstfile |awk -F"." '{print $1}' |tail -c 5;` encodefile=`echo $firstfile |sed "s/$index \./%04d\./" ` targetfile=`echo $firstfile |head -c -10`'.mov' ffmpeg -r 30 -start_number $index -i $encodefile -vcodec cfhd -b 200M $targetfile -y
批量文件夹内部处理:在oc渲染结果所在文件夹使用,把所有序列转换成cfhd视频素材,生成到../../Precomp文件夹中(会覆盖)
for i in `ls -l | grep '/' |awk -F" " '{print $9}' `;do firstfile=`ls $i -l | grep '^-' |awk -F" " '{print $9}' |grep '[0-9][0-9][0-9][0-9]\.' |head -n 1`;index=`echo $firstfile |awk -F"." '{print $1}' |tail -c 5;`; encodefile=`echo $i$firstfile |sed "s/$index \./%04d\./" `; targetfile=`echo $firstfile |head -c -10`'.mov' ; tmpcurDIR=`pwd |sed 's/\ /_/' `; outputDIR=../../Precomp/`basename $tmpcurDIR `/$targetfile ; mkdir ../../Precomp;mkdir ../../Precomp/`basename $tmpcurDIR `;ffmpeg -r 30 -start_number $index -i $encodefile -vcodec cfhd -b 200M $outputDIR -y ; done
另外,由于cfhd不支持竖屏,竖屏的编码要换用h264
for i in `ls -l | grep '/' |awk -F" " '{print $9}' `;do firstfile=`ls $i -l | grep '^-' |awk -F" " '{print $9}' |grep '[0-9][0-9][0-9][0-9]\.' |head -n 1`;index=`echo $firstfile |awk -F"." '{print $1}' |tail -c 5;`; encodefile=`echo $i$firstfile |sed "s/$index \./%04d\./" `; targetfile=`echo $firstfile |head -c -10`'.mp4' ; tmpcurDIR=`pwd |sed 's/\ /_/' `; outputDIR=../../Precomp/`basename $tmpcurDIR `/$targetfile ; mkdir ../../Precomp;mkdir ../../Precomp/`basename $tmpcurDIR `;ffmpeg -r 30 -start_number $index -i $encodefile -vcodec libx264 -b 100M $outputDIR -y ; done
3. Magick的探索性 3.1 使用Magick做图片混合的pre-后处理 问题
由于oc渲染出来好多png,在归档时候只要保留其中一些,如一个“Main+SLi(softlight20%)”的AE操作就要占用两个序列帧。
有一些比较简单的处理,就想直接写个脚本混合,不想进AE里去调整,不然还要每次命名不同替换多个序列。
探索
尝试使用Magick的合成结合shell的批处理能力,对多个序列帧进行前期的预加工。
其实OC新版本里内置的AOV已经解决了这个问题,可以前期直接AOV叠出来。不过对于带alpha的图好像依然有bug
不再建议探索以下脚本,仅记录。因为处理效果远比AE慢多了。
解决 OC渲染Cstm通道的时候会三个mask混合在一个通道
magick .exe Cstm2_0000.png -color-matrix ' 1 0 0 1 0 0 1 0 0 ' 1 .png
以下为某个特定项目的记录,给自己提供思路和语法参考
magick .exe Cstm2_0000.png -color-matrix ' .8 0 0 .8 0 0 .8 0 0 ' -colorspace RGB rose:A ;magick .exe Final0000.png -compose colorize DifFi_0000.png -alpha Set rose:A -composite 1 .8 .png;
运行的主脚本:
magick.exe Cstm18/`ls Cstm18/|grep $index ` -color-matrix ' 1 0 0 1 0 0 1 0 0 ' -colorspace RGB rose:C18R; magick.exe DeMain/`ls DeMain/|grep $index ` -compose colorize DifFi/`ls DifFi/|grep $index ` -alpha Set rose:C18R -composite rose:temp; echo $index '肤色校准完成' ;magick.exe Li7/`ls Li7/|grep $index ` -blur 2x2 -alpha set -channel A -evaluate set 15% rose:Li2B; magick.exe rose:temp -compose softlight rose:Li2B -alpha set rose:C18R -composite rose:temp; echo $index '角色光模糊混合完成' ;magick.exe rose:temp \ \( Ref/`ls Ref/|grep $index ` -blur 1x1 -alpha set -channel A -evaluate set 25% \) \ -compose Screen -composite rose:temp; echo $index 'Ref叠加完成' ;magick.exe rose:temp \ \( AO/`ls AO/|grep $index ` -blur 1x1 -alpha set -channel A -evaluate set 5% \) \ -compose Multiply -composite rose:AOFE; echo $index 'AO叠加完成' ;magick.exe convert AO/`ls AO/|grep $index ` -edge 1 -blur 1x1 -colorspace RGB rose:AOFE; magick.exe rose:temp \ \( rose:AOFE -alpha set -channel A -evaluate set 25% \) \ -compose Softlight -composite rose:temp; echo $index 'AO边缘强化完成' ;magick.exe convert rose:temp -modulate 100,105 -adaptive-sharpen 1 -brightness-contrast 5x2 $basename \_$index .png; echo $index '最后调整完成' ;done rm rose
模糊处理的备忘录
magick.exe Ref /MV_PinkWorldStage_1229_Final__Ref_0000.png -blur 5 x5 rose:Ref ; magick composite -blend 50 Ref /MV_PinkWorldStage_1229_Final__Ref_0000.png rose:Ref -alpha Set blend_blur_0.jpg
但是整体的处理效果非常慢,比不上ae的合成速度
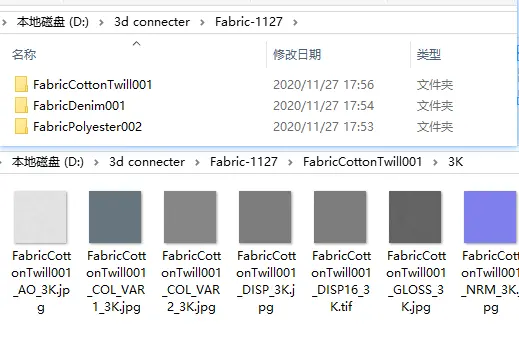
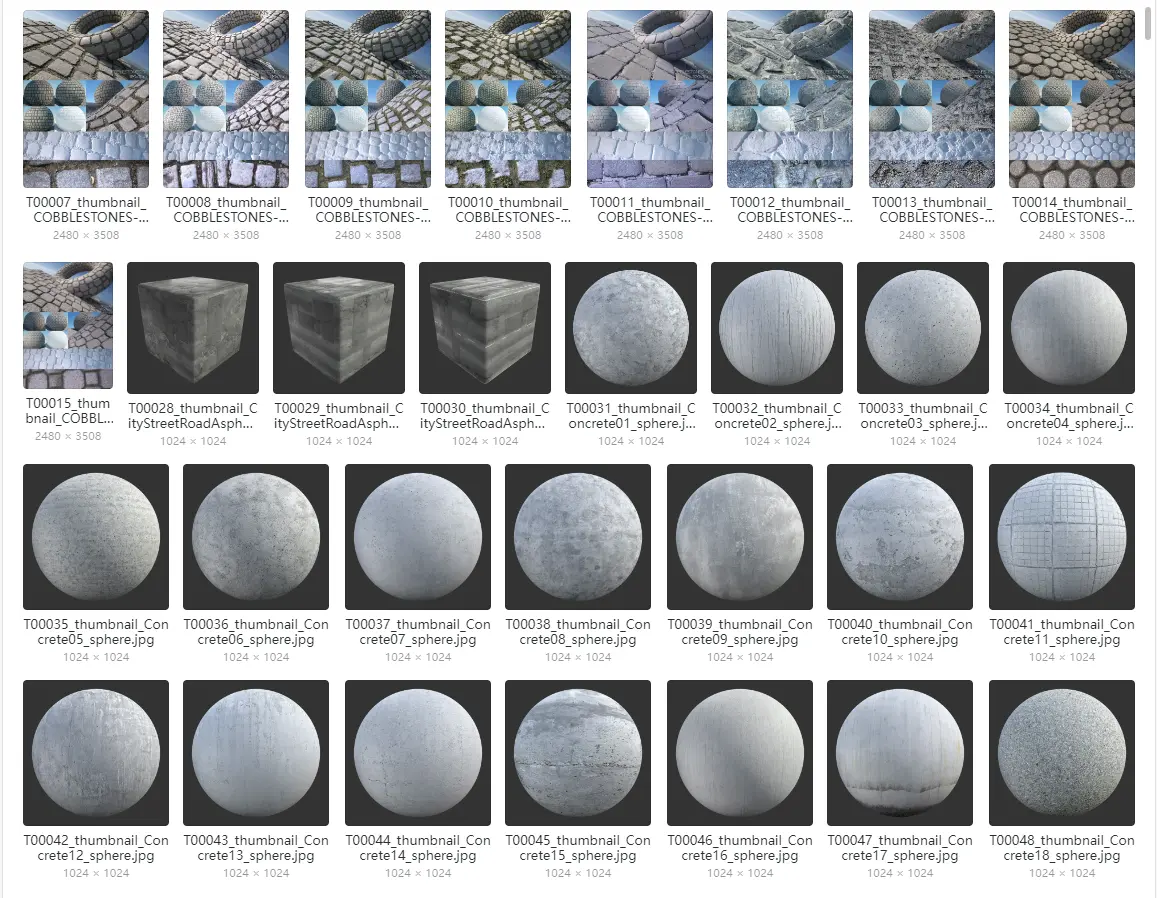
3.2 magick为贴图库建立预览图索引 问题 之前有一次下载了接近300G的材质贴图库,但是每一个都类似这样的,没有一个索引。要找起贴图来很麻烦
解决 for rdir in ./*/; do ls $rdir /**/ -d; done > list;for i in `cat list`;do magick.exe montage -geometry +0+0 -tile 5x4 -resize 512x512 $i /* /k/资产/`echo $i |sed 's/\//_/g' |sed 's/\.//g' |sed 's/\__/_/g' `.jpg;done ;
第一行先筛选需要处理的目录
解决过程详解 for rdir in ./*/; do ls $rdir /**/ -d; done > listfor i in `cat list`;do ls $i -l| grep ^-|awk -F" " '{print $9}' ;echo /k/资产/`echo $i |sed 's/\//_/g' |sed 's/\.//g' |sed 's/\__/_/g' `.jpgmagick.exe montage -geometry +0+0 -tile 5x4 -resize 512x512 $i /* /k/资产/`echo $i |sed 's/\//_/g' |sed 's/\.//g' |sed 's/\__/_/g' `.jpg sleep 2done
后记 材质贴图库已经删掉了,实在没有这么多空间存储这些利用率这么低的东西。不过建立的索引图以名字保存,倒是保留了下来。因为靠这些名字基本到网上都可以找到这个材质球的贴图。
4. FFmpeg实战记录
ffmpeg是一套综合的音视频编辑工具,支持录屏、编码、剪辑、混合等多种复杂功能,支持市面上大部分的编码格式转换,常见的“格式工厂”、“小丸工具箱”、“Potplayer”等底层均为ffmpeg。配合bash/cmd命令行工具,可以提供强大的批量编辑和处理音视频内容的功能。
目前已应用场景
将序列帧批量转换为cfhd编码,作为后期处理的预合成。在极小损失质量的情况下,减少磁盘频繁读取序列帧的压力。
抓取M3u8网页视频流,为视频批量添加水印
各种格式和编码的转换(mov转mp4、cfhd转mpeg4)
给影视素材批量上luts
截取视频片段输出gif
视频缩放大小和码率输出,压缩成一个小的视频
windows安装(基于gitbash)
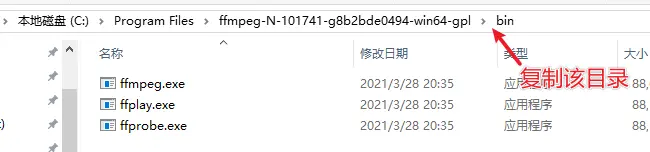
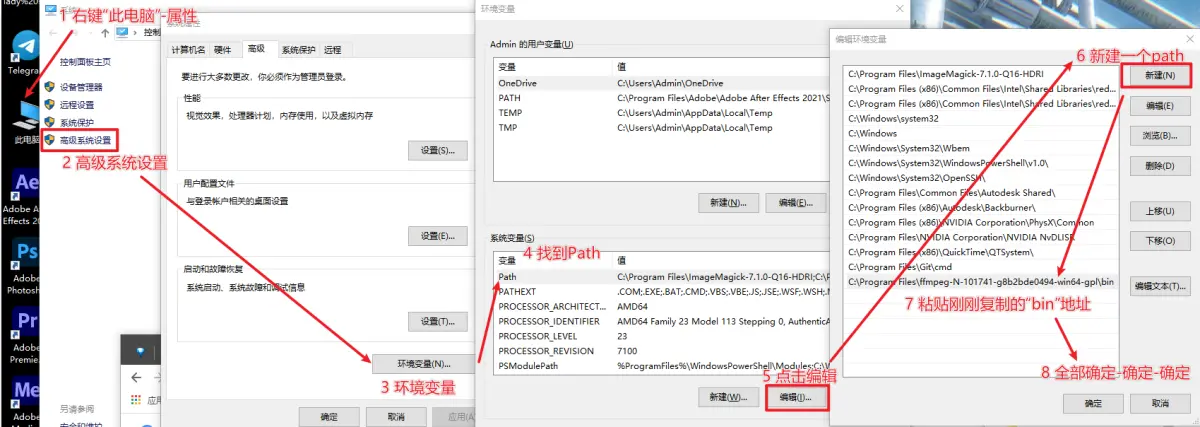
FFMPEG下载 ,选择下载对应系统版本如 ffmpeg-N-104333-g13141339c1-win64-gpl.zip 。将文件解压在一个固定不常移动的地方如 “C:\Program Files”之下。
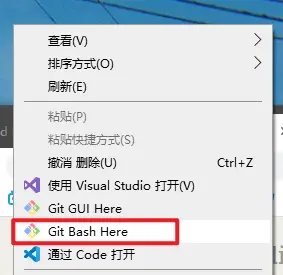
gitbash 下载,带有一个bash控制台和虚拟shell环境,可以在任意地方调用bash
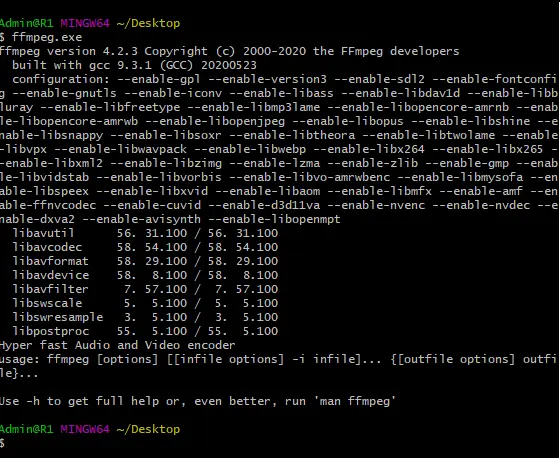
安装完成后,可以在任意文件夹右键调出“gitbash”并运行“ffmpeg.exe”,如有反应则为安装成功
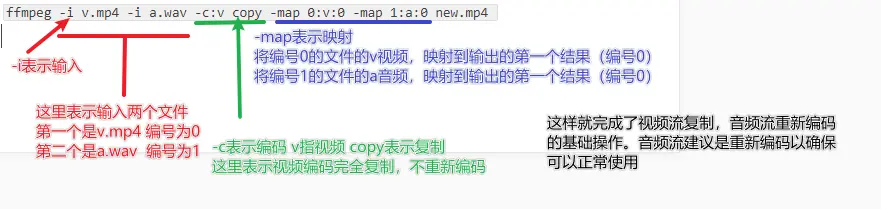
使用案例详解 1 在不重新编码视频的情况下,替换音频 ffmpeg -i v.mp4 -i a .wav -c:v copy -map 0 :v:0 -map 1 :a :0 new.mp4
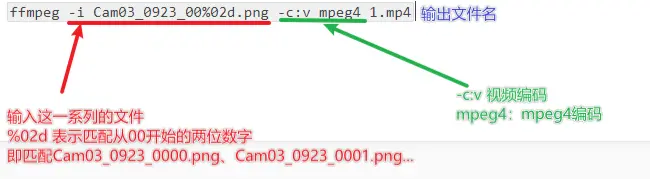
2 将渲染帧序列,编码为视频 ffmpeg -i Cam03_0923_00%02 d.png -c:v mpeg4 1 .mp4
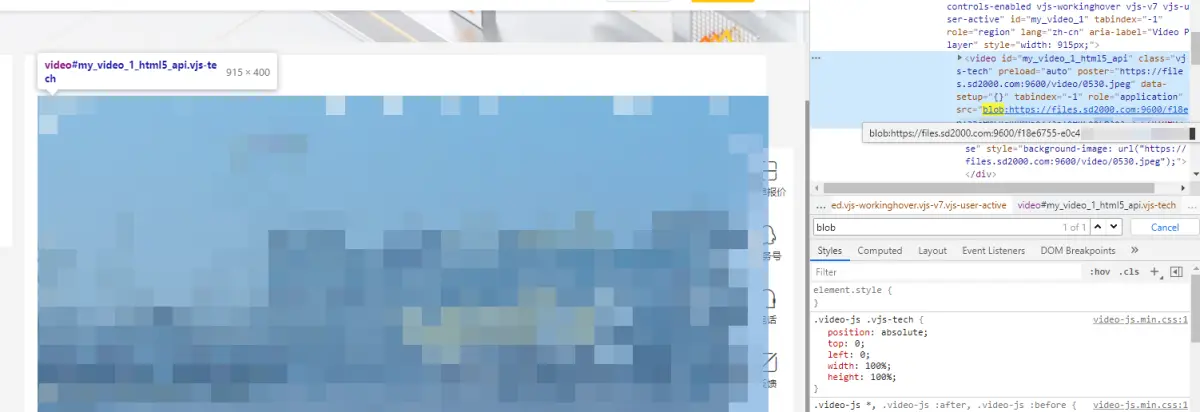
3 ffmpeg抓取blob协议链接视频
这里记录了探索过程,操作上建议直接看3 修订
在网上需要下载一些视频,发现视频引向的协议是blob:// 开头,没办法直接下载。
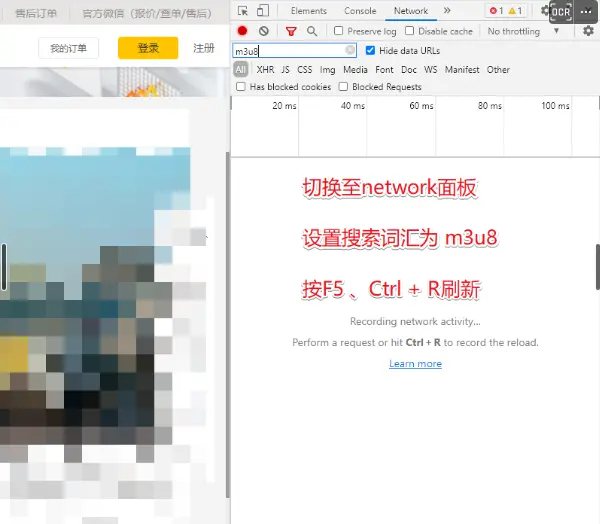
使用ffmpeg直接下载m3u8视频流。
准备ffmpeg:
windows下载 (bin文件夹中)Mac下载 (mac如右图,下载最新即可)运行cmd / 终端,切换到软件所在路径。
按照基本命令下载ffmpeg -i [m3u8地址] 输出文件名.mp4
4 修订 使用猫抓 可以直接在线调用ffmpeg下载m3u8
操作备忘录
将mov格式转码为mp4格式(不转换编码,需要编码支持)ffmpeg -i input .mov output.mp4
视频转序列帧 ffmpeg -i video .mov frames.%04 d.jpg
序列帧转为视频,cfhd、libx264等常用编码都可ffmpeg -i /test /test %04d.jpg -vcodec mpeg4 test .mov
三个视频 01.mp4,02.mp4,03.mp4,按顺序连接合并成一个。 ffmpeg -i "concat:01.mp4|02.mp4|03.mp4" -c copy out .mp4
给视频添加水印(可批量)。将logo.png作为水印,添加到离左上角(顶部和左边)分别20个像素位置。 ffmpeg -i in .mp4 -i logo.png -filter_complex "overlay=20:20" out.mp4
截取一部分视频作为gif动图。例如:将视频的7.5秒到8.5秒截取,输出gif动图。 ffmpeg -i in.mp4 -ss 7 .5 -to 8 .5 -s 640 x320 out.gif
把视频缩放到原来一半尺寸大小ffmpeg -i input .avi -vf scale="iw/1:ih/2" output .avi
缩放指定尺寸ffmpeg -i input .mp4 -s 720 x480 -c:a copy output.mp4